Methods of Revolution [Day 6]

| Video title | Methods of Revolution [Day 6] |
|---|---|
| Creator | Unknown |
| Channel | Jadusable |
| Upload date | May 9, 2020 |
| Runtime | 8:23 |
| Tags | N/A |
| Game | N/A |
"EVERY FLOOR IS A PRISON"—Predecessor, Methods of Revolution [Day 6]
Methods of Revolution [Day 6] is the fifteenth video of Awakening, and the thirty-fifth video in Ben Drowned. It is preceded by Methods of Revolution [Day 3] and followed by Methods of Revolution [Day 11].
Synopsis
The second player leaves his room and explores the hotel. He makes his way to the second floor and finds more notes left behind by his predecessor before finding himself trapped in another room for the night.
Video
Description
N/A
Transcript
The Rosa intro plays as images flash across the screen, first a crooked image of the flashlight on a tiled floor coming into focus, then Player Two turning one of the “Silenced” pages on the notepad, a screenshot of methodsofrevolution.com in its state from the April 29th update, and finally the results of the “What Items Do You Choose?” poll showing the notepad and pen, flashlight, and model head as winners.
A light turns on and we are greeted to Player 2’s desk. The notepad and pen, model head, radio, knife, song book, and Holy Bible are visible. As Player 2 gets up, the camera pans above the knife towards the radio and crumpled paper with the word “HE” written several times, the paper under it seemingly torn into strips. The camera moves quickly to reveal the flashlight which he picks up and moves around in his hand, clicking it on and off, before pocketing it. He then turns back to the far right of the desk, and he quickly picks up and pockets the notepad and pen. He grabs the model head and the camera focuses on it for a few seconds before Player 2 spins it and moves it off-camera.
The camera pans across the floor to focus on the hallway door. Player 2 takes a loud breath and the camera turns back around to the desk where he has his hand on the lamp’s light switch. Just before he turns out the light, we get a clear view of the clock on the desk, which is still stuck at 4:23. After the light is shut off, the camera moves towards the door in darkness, and Player 2 clicks on his flashlight adjusting its beam from a large, shallow, circular area to a small, narrow, square area as he walks to the door. The light focuses on the “DON’T LET HIM HEAR YOU” sign before Player 2 clicks it off to open the door, and the dark of the room is filled with bright yellow light from the hallway. The camera stays low as Player 2 exits the room and we see the carpet and bottom of the adjacent room’s doors. We hear him close the door behind him off-screen and the camera moves to the right where we see a door at the end of the hallway with a diagonally leaning white plank covering it. In front of the door, three cardboard boxes are on the ground on the left, and two larger ones are on the right. Another white plank is on the ground in the hallway, far from the boxes. We hear Player 2 breathing heavily as the camera then pans to the left where a set of glass doors and windows leading to the outside are close to the Player. He exits through the first set into a vestibule and he attempts to push open the outside doors but they are locked. There is no light coming through these doors, and the outside is not visible, as the reflection of the inside is shown on the glass. Player 2 attempts to knock on the outside door but gets no response.
He turns towards the wooden stairwell door labeled “EXIT” on the bottom. He peers at the stairs through a small rectangular window on the door before opening it. Once in the stairwell, Player 2 turns towards the left where a windowless metal door is, in the same direction of the glass outside doors. He does not attempt to open this door and the camera pans to look up at the staircase as we hear a thud. The camera faces towards the ground as Player 2 begins to ascend and we hear four more thuds. He stops and moves his camera upwards focusing on the railing of the staircase above him. Another thud is heard as he reaches the first landing. He ascends the next set of stairs and reaches another wood door with red paper over the rectangular window. A sign next to this door reads:
- Stair 2
- Has Room Access
- 2nd Floor
- 1 Thru 4
- Fire Door Keep Closed
We hear Player 2 breathing and, as he opens the door, we hear a sharp knock. The door opens to a dark red-tinted hall, and looking up reveals that it is illuminated by a glowing red “EXIT” sign. He closes the stairwell door behind him and turns down the hall to the left. Illuminating the hall are emergency lights above doors on the left side and more red “EXIT” signs further down. He turns briefly to the right to see a dead end. He turns back down the hallway, clicks on his flashlight, and adjusts his arms so that the flashlight is held high up in view of the camera. He points it down the hall and turns to look at each of the first four doors around him before continuing further down the hall.
Player 2 passes four additional doors down the hallway, breathing heavily as he goes. As he passes a fifth door, the flashlight begins to flicker. Standing next to a door labeled 229, he clicks the flashlight and it stabilizes. He looks briefly to the left. It centers as he continues walking past another set of four doors. Just beyond, the flashlight points at a towel laying on the left side of the hallway. He looks around completely and narrows the flashlight beam to look further down the hall behind him. Returning the flashlight to its wide beam, he turns around and continues walking.
As he walks by another group of doors, voices can be heard coming from behind the last one on the right hand side. He points the flashlight toward the door and approaches it. They grow silent as the light lowers to the bottom of the door. He shifts the hand holding the flashlight and points it back to the hallway at large as he moves on.
A light from a space to the left illuminates several boxes and plastic littering the floor. A beeping sound can be heard in the background. The flashlight drifts off to the right a few times as he approaches. He pauses and focuses the light on the area just beneath the overhead light. He turns to the left, looking at the room door he just passed for a moment.
He turns back and keeps walking past a cardboard box until he is next to a shallow hallway perpendicular to the one he is in. The beeping noise is slightly louder. He stops abruptly and points the flashlight to the left at a door at the end of the shallow hall bordered by stacks of more cardboard boxes. Focus drifts past a chair to more boxes and stray plastic and back up before going back to the hallway. He pauses in front of the boxes in his way before shuffling through them.
The flashlight drifts to the second door on the left. It pans to the first door on the right before centering down the hallway once more. Player 2 walks past them and the next set of doors, glancing at the last door on the second set briefly.
He approaches a door on the left labeled “206”. Turning to look back the way he came, he narrows the flashlight beam down the hall. After a moment, he turns back to the door.
Player 2 flicks off his flashlight and bursts through the unlatched door. Here we find a room brightly lit by a standing lamp and a desk lamp with white sheets covering windows and mirrors. There are three papers on a long table in the foreground and a telephone on a dresser in the background. There are towels strewn about on the floor and an unlatched communicating door to the adjoining room. We hear the hallway door close off-screen behind Player 2 as he goes further into the room. He turns to the right and puts his hand on the communicating doorknob, unintentionally shutting the door. This door is locked and Player 2 attempts to jiggle it open for a few seconds before holding his hand up to the camera in defeat. He goes further into the room where two additional pieces of paper are found behind the phone. The camera focuses first on the tan hotel phone before panning left to the two notes, written on small sheets of notebook paper that Player 2 straightens and brings closer together so that both are in view of the camera. The first note we see, which is on the left, reads:
- SO MANY MORE VOICES UP HERE
- ______
- HE HEARS THEIR CRIES
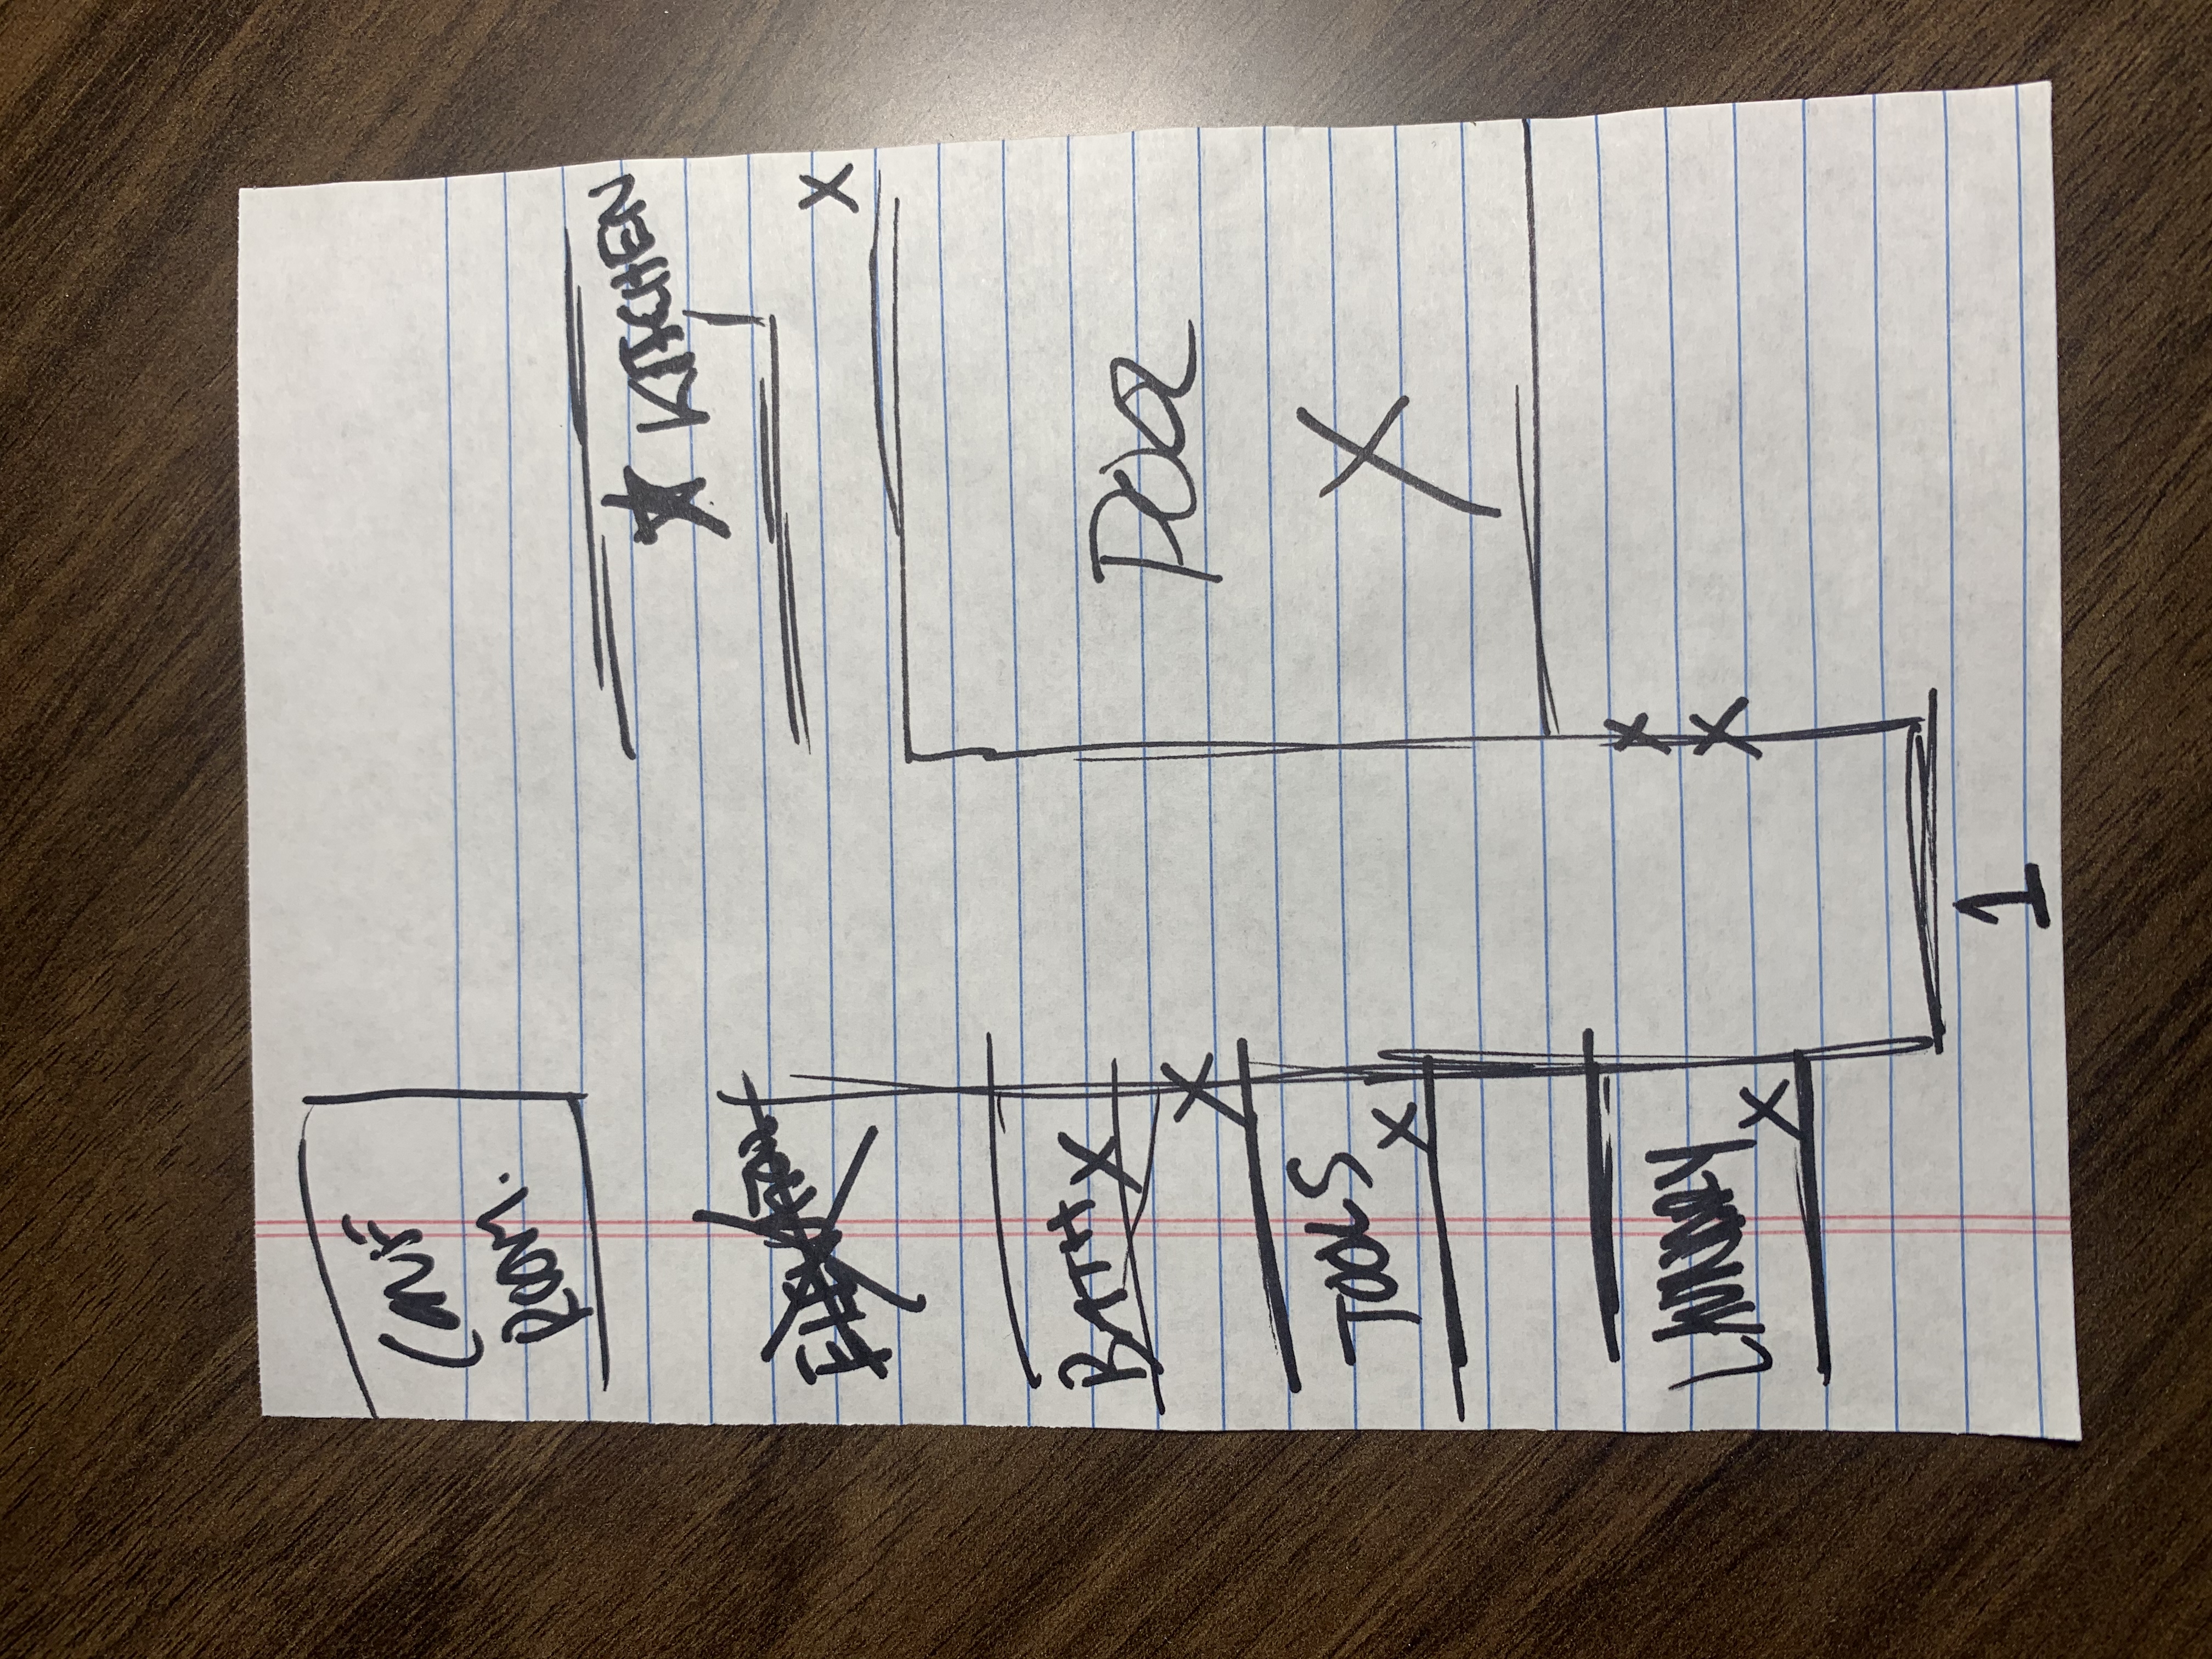
The second note, on the right, has a Sharpie-drawn map which would later be featured as the header image for methodsofrevolution.com. The bottom of the note has the number “1” and a drawn hallway with (on the left) a room labeled “LAUNDRY” with an accompanying “x”, a room labeled “TOOLS” with an accompanying “x”, an “x” between a TOOLS and a “BATH” room, which additionally has its own “x.” Above that is the word “ELEVATOR” which is both crossed and x-ed out. Above this is the “CONF ROOM”, where no accompanying marks. On the right side of the page are two “x”s on the hallway walls and a very large square room labeled “POOL” with an “x” under it. There is another “x” above the pool on the far right side, far from the hallway. Above the pool is a narrow rectangular room titled “KITCHEN” that is marked with a star rather than an “x.” He then turns back to view the entrance of the room. The door to the hallway has a large sign saying “KEEP GOING” in black marker above the door handle. The closet door is slightly ajar. He focuses on three side by side notes on similar small notebook paper. The first note reads:
- IS THIS MY FAULT?
- DID I ASK FOR THIS?
- SILENCED MY LIFE AWAY
The second reads:
- EVERY FLOOR IS A PRISON
- NO ESCAPE
- THAT IS NOT THE WAY OUT
And the third reads:
- I’M LEAVING THE LIGHT ON
- PLEASE LET THERE BE OTHERS LIKE ME
- - FOLLOW ME -
- ......
He then flips each of these notes over in reverse order, revealing no additional writing on the back of the sheets.
He walks back to the hallway door and opens it, looking left to the empty hallway. A high pitched wind sound is heard and as he turns to the right, we hear the room door shut behind him. He clicks on his flashlight to reveal a shadowy figure down the hall. Player 2 frantically turns back around and goes back into the well-lit room, slamming the door shut and locking it. He backs up and stares at the door, waiting. Quietly, we hear one last instance of the sound, a faint “whoosh” noise. The player turns back towards the room and takes a seat on a gray cushioned chair opposite the dresser and telephone.
Gallery
The following images flashed by rapidly for the first 10 seconds:


Notes
TBA